Today I dove into a lesson that was entirely new to me. I remember having to "complete the square" in Calculus but I don't think I was ever quite sure of the algorithm and I spent some time reteaching myself over the weekend in preparation for this week's lessons. I even derived the quadratic formula from a trinomial in standard form- it was a thrill for this math nerd!
I tried to look for a way to make completing the square easy, fun, engaging- anything other than a long algorithm to memorize.
Here's how my lesson went today:
I began by giving the students a "puzzle" to solve with Algebra tiles. Could they make a square with x^2 + 6x + 9 while following the rules we'd already established for how Algebra tiles can touch each other? The kids made the square easily and were unimpressed; after all, we'd been through this weeks ago when we started factoring!
Next, I gave the students x^2 + 4x + 6 and asked them to make a second square. They worked at it for a while and then complained that I had given them an impossible task. I was pleased to note that most kids started with the x^2 tile in the upper left and 2x to the left and bottom of this tile. Instinctively, they realized that they would need to evenly split the linear term to form a square. They tried other combinations after this and then tried to get creative- adding tiles, hiding tiles, overlapping tiles, and breaking all sorts of Algebra tile rules.
I asked kids how many "1" squares would be necessary to make a square in the previous problem. They knew it was 4.
We moved from these concrete examples to guided notes that worked through the algorithm. In each step, I referred back to the models we'd made to reinforce how the algorithm matched what they had done on instinct. And thus began the whining, complaining, whimpering, and near mutiny! They wanted nothing to do with this lesson, don't see the point, think it's too hard, are scared of the quiz, etc, etc.
I took as a sign of divine providence the fact that I had a meeting scheduled with my supervisor just after school. We're writing curriculum for Common Core implementation. Since she is just recently out of the classroom, and had recommended that I include completing the square in the course, I decided to ask what she would have done. Her answer: she just taught the algorithm, plain and simple- not the answer I was looking for. She was impressed by the work I'd had the kids do with the Algebra tiles but just kept explaining how important completing the square is in later math courses. Unfortunately, I didn't get any suggestions to improve my lesson which was what I was hoping for. I can't see completing the square being useful until at least Pre-Calc (and my students are in middle school, so that's at least three courses away) so I'm returning to the question I've been wrestling with since the weekend: is completing the square necessary at this point and are my students developmentally ready for it? I question the wisdom of doing some problems just to say it's done. I want to improve my lesson, so if you have any magic answers, please share!
Tomorrow, we'll finish our guided notes, complete a foldable to summarize the process, and try several example problems. Wish me luck!
Wednesday, February 27, 2013
Monday, February 25, 2013
Slope-Intercept Form Battleship
I've seen a few variations of using the famous game Battleship in math class. Who among us hasn't used it (or at least the concept) when reinforcing graphing coordinate pairs?
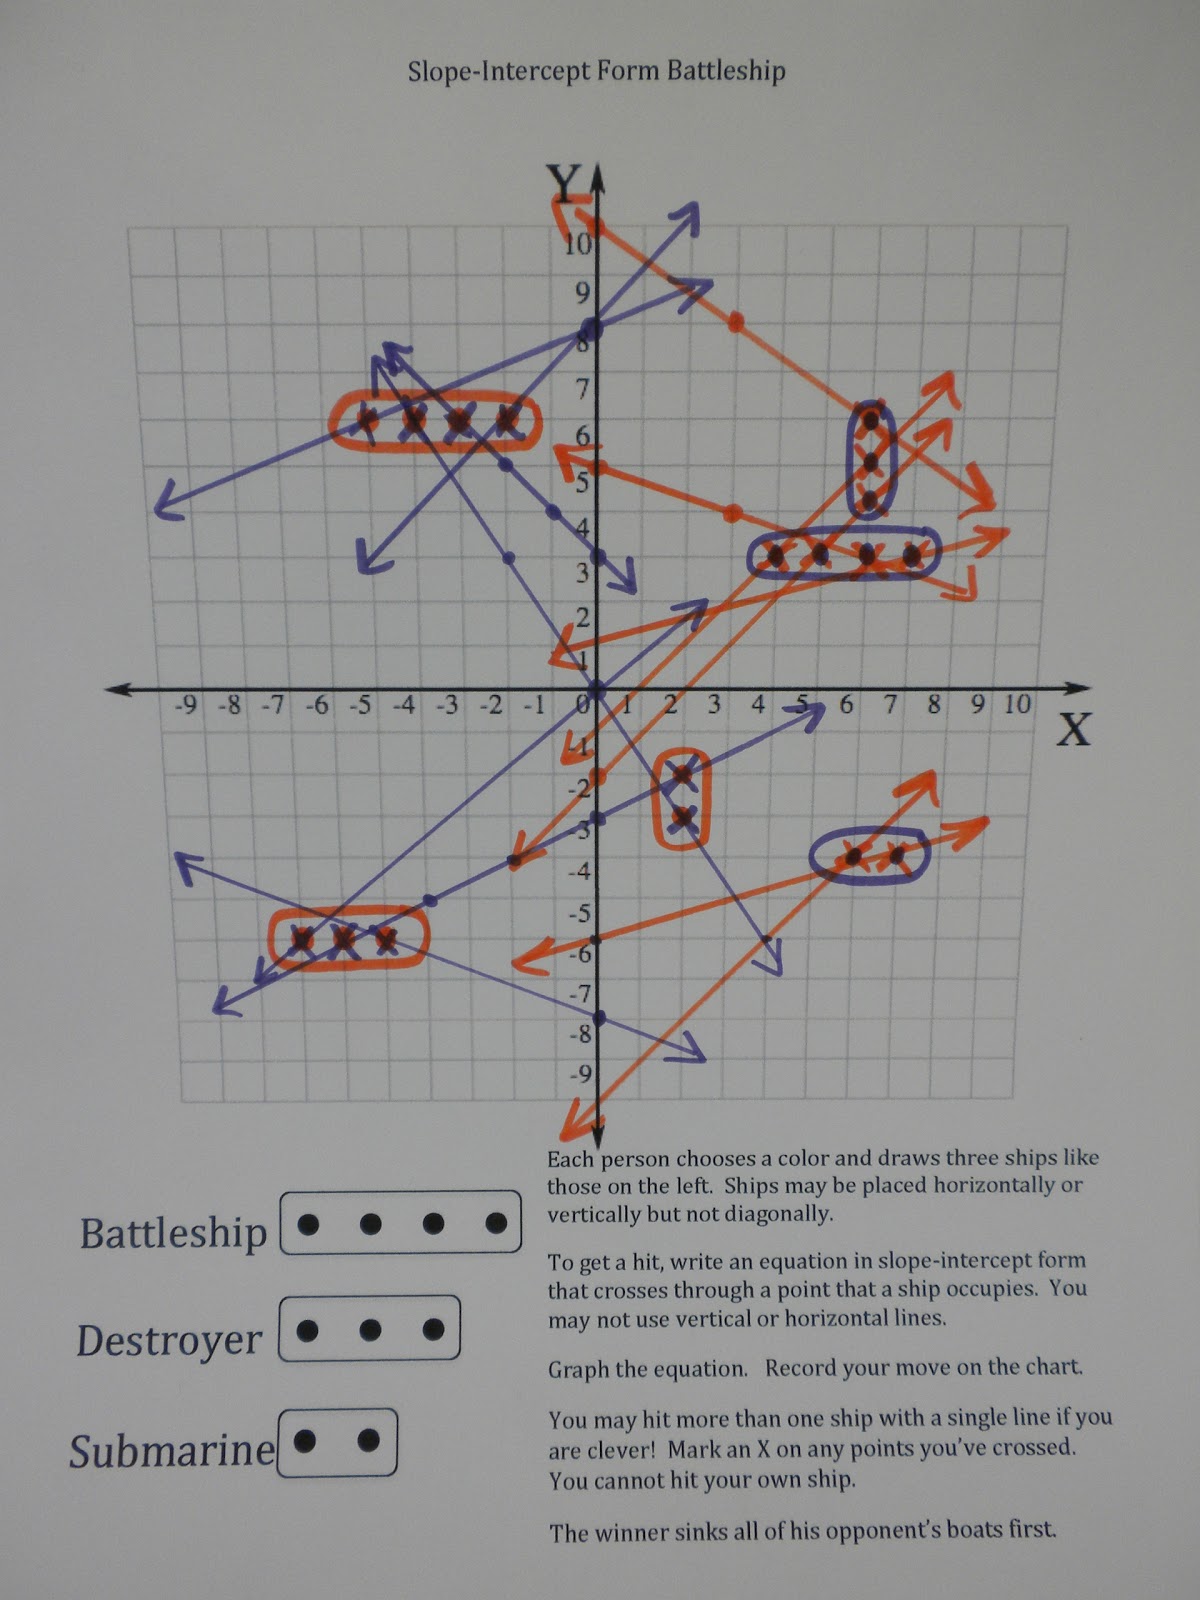
Taking it in a slightly more advanced direction, let's make a 4 quadrant Battleship grid. And let's require kids to write equations in slope-intercept form, graph them, and develop a strategy for this process. (Putting equations in point-slope would be a great substitute if you want one.)
Here's how it works:
Materials (for each team of two students):
1 paper Battleship board (or graph paper with axes drawn and labeled)
1 Record sheet (or notebook paper)
2 different colored pencils or markers
1 ruler
Procedure:
1. Place students in pairs and distribute materials. Depending on the level of your students and their experience with slope-intercept form, you might consider doing one round as a whole class activity, as a "beat the teacher" sort of thing before you pair off.
2. Students take turns placing their ships. Ensure that the dots are placed on integer ordered pairs.
3. Students take turns writing and graphing equations that hit their opponents ships. They should record the equation they choose and the point or points the line hits on the ships.
4. Encourage students to look for lines that will result in more than one hit at a time. These spice up the game.
5. The first player to hit all nine coordinates occupied by his opponent's ships wins. Prizes are always welcome!
6. I'm photocopying the board double sided so that my students can do a rematch and refine their strategies. The graded portion of this activity include reflection on strategy.
7. Complete reflection activity independently (as HW, perhaps).
Here are some photos of my sample. I'll share this with my class so they can see what I'm looking for.
Want to try this in your classroom? If I did it right, the file should show up below. I just got box.com, yay!
Or try this link: Battleship PDF
I'm posting to Made 4 Math Monday because I made it and it's Monday!
Mathematically yours,
Miss B
Taking it in a slightly more advanced direction, let's make a 4 quadrant Battleship grid. And let's require kids to write equations in slope-intercept form, graph them, and develop a strategy for this process. (Putting equations in point-slope would be a great substitute if you want one.)
Here's how it works:
Materials (for each team of two students):
1 paper Battleship board (or graph paper with axes drawn and labeled)
1 Record sheet (or notebook paper)
2 different colored pencils or markers
1 ruler
Procedure:
1. Place students in pairs and distribute materials. Depending on the level of your students and their experience with slope-intercept form, you might consider doing one round as a whole class activity, as a "beat the teacher" sort of thing before you pair off.
2. Students take turns placing their ships. Ensure that the dots are placed on integer ordered pairs.
3. Students take turns writing and graphing equations that hit their opponents ships. They should record the equation they choose and the point or points the line hits on the ships.
4. Encourage students to look for lines that will result in more than one hit at a time. These spice up the game.
5. The first player to hit all nine coordinates occupied by his opponent's ships wins. Prizes are always welcome!
6. I'm photocopying the board double sided so that my students can do a rematch and refine their strategies. The graded portion of this activity include reflection on strategy.
7. Complete reflection activity independently (as HW, perhaps).
Here are some photos of my sample. I'll share this with my class so they can see what I'm looking for.
 |
| Game Board filled in |
 |
| Record sheet- I won't plan to grade this, but it keeps kids accountable and will help if they have a question or dispute to bring to me |
Or try this link: Battleship PDF
I'm posting to Made 4 Math Monday because I made it and it's Monday!
Mathematically yours,
Miss B
Monday, February 11, 2013
Factoring Polynomials Tarsia
It's time for Made 4 Math Monday! I have a Polynomial Factoring Tarsia/Puzzle to share today. This mixes all of the forms of factoring that my students have been working on in the past two weeks. I've seen lots of Tarsia examples on Pinterest but the free software is only PC compatible and I typically use a Mac. My PC is a bit of a dinosaur, so I haven't even tried out the software yet, so I went old school on this!

Answer Key: You'll need to check that the pieces are in the correct rotation so that the sides actually match. The 16 pieces form an equilateral triangle.
Row 1: N
Row 2: A G C
Row 3: J K I B D
Row 4: O E L F P H M
My other Made4Math item this week is new tubs for each table in my classroom. We christened them today and so far, so good. I even had a bunch of comments from my 5th period class: "Wow, you bought us new tubs!" "Those look really good!" It's nice to be noticed. The materials all fit nicely when I filled them up this morning and kids didn't need much time at all to get and replace the things we used today. I seriously hope this is my last venture into reorganizing supplies this year since we're halfway in and on the third system!
Sunday, February 10, 2013
Made for Math- New Tubs
This year has been an organizational catastrophe for me. I'm on my fifth curriculum in as many years (two new ones this year alone), so my filing cabinets are not anywhere near as helpful as I'd like them to be. No one should be allowed to even look at my desk right now. I started off the year with my desks in rows and each kid had a handy pencil bag with supplies to use. They worked great until I switched my classroom setup to groups in December following some Kagan coursework and there wasn't a place for each kid to have his own bag. For the past two months, the communal supplies have annoyed me. I bought some rectangular bins that worked OK but kids didn't have a specific enough home for each item, so they became a mess in just a few weeks. I may be a mess, but I like my kids to know where things are and be able to keep at least that little aspect of the classroom organized for me!
Yesterday, I scored at Walmart with an awesome deal. In the clearance aisle, I found six blue shower caddies for just $1 each. As luck would have it, there are six tables in my room! They're about $6 each online so I saved a bunch but they're probably worth $5-6 because they're super sturdy. They're larger than other shower caddies I've seen, so they can hold all of the supplies I like for my kids to have on hand: scissors, glue sticks, red pens, highlighters, dry erase markers, cloths to erase the markers, protractors, and compasses. I'm going to try having a stapler on each table too, though I worry that it could be too tempting as a potential toy/weapon. Today, I printed out labels for each of the supplies so kids see where to place them in the bins. A layer of packing tape over the labels will seal them in and thwart graffiti. Aren't they great? I sort of loathe this color blue, but I'm not one of the teachers who has a perfectly matched color scheme (or even a poorly matched one for that matter), so blue will be just fine.


As you can see in the last picture, I put 3 9oz disposable cups in one side to help separate the pens, highlighters and markers. Total project cost: $7- $6 for bins and less than $1 for cups and labels! Yay!
I can't wait to fill these up tomorrow and have them on the tables for my kids to use.
I'm posting this to Made for Math Monday. Check them out for great ideas.
Update (6/29/2013): These tubs made it through the end of the year just fine. The kids mostly did a good job getting the materials back into the right place. For the fall, I'm going label each item as to which tub it belongs to. As an open container on the table, there was much more temptation for students to play with the materials than when we had the individual bags on the desks. The staplers never caused a problem like I thought they might. If you're interested in using these, I just found them at Walmart for $2.88 each, now in a frosted clear color instead of blue. Check the back to school area because they also have pink and teal there for college kids.
Mathematically yours,
Miss B
Thursday, February 7, 2013
Factoring Flow Chart
Then we moved into factoring on paper. My next post will feature a foldable flip book on which we took notes about all the steps of factoring and the special patterns. Today I'm sharing the flow chart we're using to help guide students through the process of factoring. We're struggling a bit with the GCF but everything else is pretty smooth sailing. I introduced this chart yesterday to remind students to start by factoring out the GCF. Feel free to print these off for your students if you use a similar method.

Monday, February 4, 2013
Angles Formed by Parallel Lines Cut by a Transversal Foldable for Geometry or Middle School Math
I've taught angles formed by parallel lines cut by a transversal in geometry and in my on-grade level 8th grade classes. Students generally catch on without much trouble, but there are often a few students who have trouble matching the vocabulary to the diagram.
Here's a foldable I'm going to use with my students in Algebra I and Intermediate Algebra this year to practice the vocabulary prior to our state testing next month. (Eep! Next month is March already?) Our students need to know corresponding angles, alternate interior angles, and alternate exterior angles. I generally include same side interior and same side exterior for means of comparison and because they're going to need them for geometry anyway, so it makes sense to introduce the vocabulary at the same time.


Would you like to use this with your class? Download the PDF here and enjoy. Let me know how it works with your students.
Mathematically yours,
Miss B
Subscribe to:
Posts (Atom)